MATERIALS:
You will need:
- The pattern (download it as a PDF and print it to A4)
- Felt in yellow, orange, and red
- Embroidery thread in colours matching the felt, and black (for the eyes)
- Stuffing material (e.g. Hobby-fill)
- Two small black beads for the eyes (2-3mm)
- Tools - scissors, small curved scissors, embroidery needle, stapler, pins
- Blusher for the cheeks (optional)
STEPS:
1. Cut out each pattern piece leaving a small margin of white paper around the pattern. Pin or staple each pattern piece onto the felt.. (I personally prefer to staple rather than pin, as I find pins distort the felt/pattern, but it's a personal choice). Cut each piece out of the felt, using the small curved scissors for smaller shapes like the feet and hair tuft.
2. Prepare the bow first. Fold the bow front so that the ends meet in the middle of the bow at the back.
3. Attach the 'bow back' to the back of the 'bow front' with a couple of small stitches.
4. Fold the 'tie' around the centre, pulling it tight, then stitch at the back, securing the bow (make sure the stitches don't show on the front side of the bow).
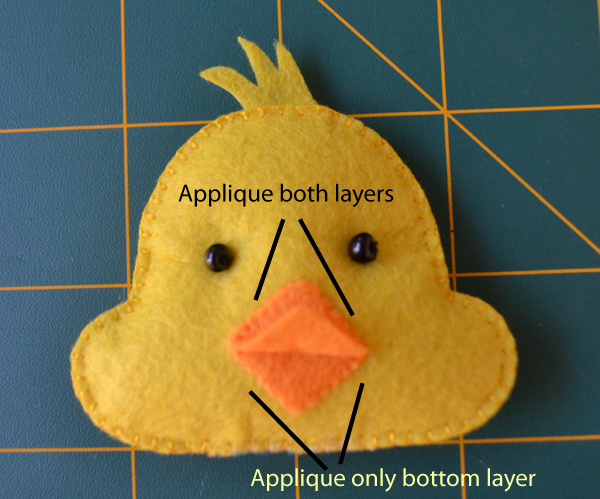
6. Prepare the head. Position the two layers of beak on the front layer of the face. Applique both layers of beak onto the face on the 'upper' side of the beak, and only the bottom layer on the 'lower' side of the beak (see picture below for diagram). Fold the top layer of the beak upwards (so it looks like his mouth is open), then secure in place with a couple of small stitches in the middle. Sandwich the tuft of hair between the two layers of the head, then blanket stitch all the way around (trapping the tuft between the layers), leaving a 1 inch hole at the bottom. Stuff the head with filler through the opening, then finish the blanket stitching around the head. To attach the eyes, use a single strand of black thread, make a small knot at one end. Push the needle up through the back of the head, all the way through and out the front, put the bead on the needle, then put the needle down through the same hole. Pull the thread quite tight so the 'eye' sinks into the head a little. Repeat 3 times. To finish, thread the needle through the filling in the middle of the head and away from the eye, bring the needle out, snip the thread right close to the felt, tug the felt a little and the end will disappear into the head. The little knots at the back of the head should also have practically disappeared into the back of the head (but a dimple will show on the back of the head for each eye).
7. Blanket stitch the body, wings and feet together, stuffing each piece using the same method as the head.
8. All parts are ready, so we can now assemble the chick. Start by sewing the wings onto the body. Put your needle through the existing blanket stitch holes in the front of the wings for a neater finish (as I am doing in the picture below). If you can manage it, sew the wing onto the front layer of the body only so the stitches don't show on the back of the chick's body. This can be a little fiddly, so if you are struggling you can always sew all the way through to the back. Next sew the head on, then the feet, and finally the bow.
9. Apply a little blush with a cotton bud, if desired. You can also use fabric paint.
Notes:
- This tutorial has some trickier parts which could be a challenge for a complete beginner, and requires knowledge of hand stitches such as blanket stitch, applique stitch and back stitch.
- Due to small parts this toy is not suitable for babies or toddlers. If you want a young child friendly version you can embroider the eyes, or just use a small circle of black felt instead of beads.


Totally gorgeous Sedef!! My girls would go crazy for one of these cute chicks :)
ReplyDeleteThank you very much Ros :) I enjoyed designing and making him so much that I am thinking of a whole menagerie of felt animal patterns over the coming months... Depends on the sort of reception this little guy gets I suppose!
DeleteThis is absolutely beautiful! Your photos are stunning! Thanks so much for sharing the tutorial with us and have a great week. ~Cindy@littlemisscelebration.com
ReplyDeleteYour chick/duck is super - I think I'll make one in white as well. Thanks so much for sharing this.
ReplyDeleteHe is such a cutie! I'm new to working with felt, and the way you've laid out your pattern and the tutorial makes everything so easy to understand! I'm looking forward to a "whole menagerie", LOL, and your tips and tricks!
ReplyDeleteThank you!!!
ReplyDeleteAdorable !
ReplyDeletemerci pour ce partage
Amei este patinho, lindo♥
ReplyDeleteFicou lindo, adorei seu patinho! Parabéns! Que sua semana seja encantadora!
ReplyDeleteThis has got to be the cutest lil chick I have EVER seen !!! Just adorable !!!!! Thank you so much for sharing the pattern !!!
ReplyDelete